For a long time, I've had some version of this in my head. This week I finally managed to complete my multi-bee interactive audiovisual multimedia piece... just in time for the Bees (& the Birds)show at Graven Feather. You may recall that a few years ago, I made a linocut bee in electrically conductive in (specifically Bare Paint, which I mixed with some block printing extender to get a better viscosity for making a linocut). I combined this with an Arduino microcontroller so the bee itself could act as a capacitative sensor. In simplest terms a capacitor is made of two electrically conductive - usually metal - plates with a gap between them. The gap can be nothing but air, or a variety of electrolytes. If there was a wire between the plates, charge would flow freely. Because of the gap, charge builds up on one plate a dissipates at a certain rate to the other. The rate at which this happens depends on the capacitance, which in turn depends on things like the physical properties of the plates, electrolyte and the size of the gap. So, a capacitative sensor takes advantage of the latter to sense proximity, or, measure capacitance to tell you the gap between two "plates". In my case the "plates" are bees printed in electrically conductive paint and my hand. This is the principle behind the theremin (though, they are of course, a great deal more sophisticated, but the idea is the same)*. Here's an example of an earlier prototype from 2012:
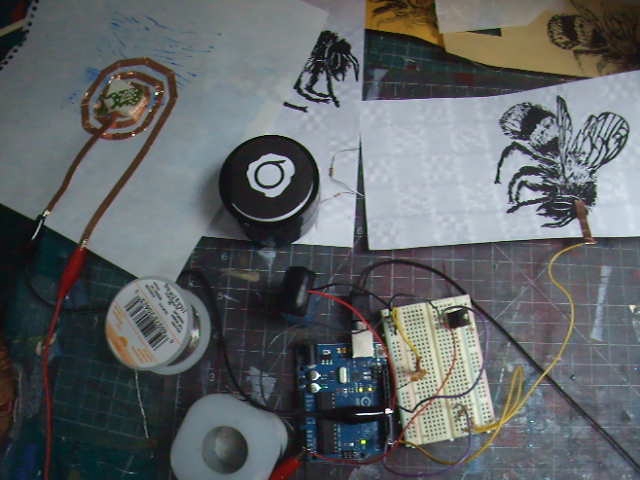
So, I can use my linocut on paper connected to an Arduino microcontroller as a sensor, and use the Arduino then to trigger a audio response when someone approaches the linocut. A very simple speaker can be made from a current-carrying wire in a spiral, affixed to a membrane, next to a strong magnet.** So, above I made a speaker with a piece of paper, copper tape as wire and a magnet.The next step was to carve a spiral lino block and block print a speaker on paper with electrically conductive paint, which I did. Thus an actual print, a sheet of paper, becomes both sensor and speaker. I had planned to then make a piece which had multiple bees as multiple sensors which would trigger different reponses. I created the artwork in time for my show about bees in 2013.
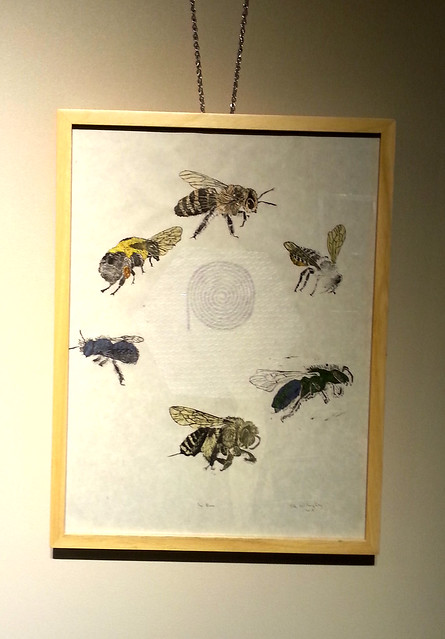
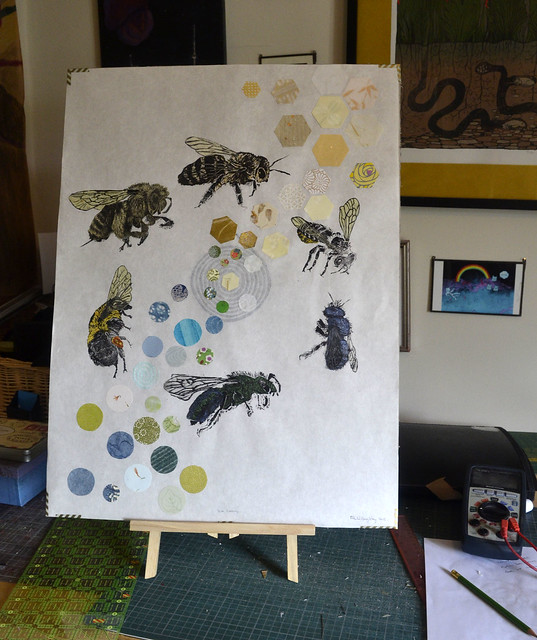
The Bees, Ele Willoughby, linocut on various Japanese washi, 18" x 24", 2013.
I had planned to add sound to this piece, but didn't have the opportunity.
I had two issues. First, my prototype used only an Arduino. I was able to play back sound by keeping the recording length quite short and the sampling rate low. There's only so much on-board RAM. I could make multiple sensors each play the same recording, but I simply ran out of memory using only an Arduino.
Secondly, I got pregnant and chose to put electronics aside for a while. I couldn't find any reliable medical guidance about soldering electronics while pregnant or in the proximity of babies (as if there aren't in fact large numbers of engineers, scientists, artists and hobbiests who are women of child-bearing age, ahem!), but jewellers were warned to avoid lead solder, and I opted to err on the side of caution. Lead and developping nervous systems struck me as a bad combination.
So, now that my son is one and a half, I've had an opportunity to return to the idea. The obvious way to add more sound to a project is the off-the-shelf solution of adding a Wave Shield to the Arduino. This is a second circuit board which plugs into the first to let you control and play files from an SD card to a speaker. (Bare Paint has recently released their own microcontroller, the Touch board based on the Arduino, but specifically with their applications for their paint, such as capacitative sensors, in mind. This might have been an easier way to go... but I had an Arduino, so I chose to add a Wave Shield).
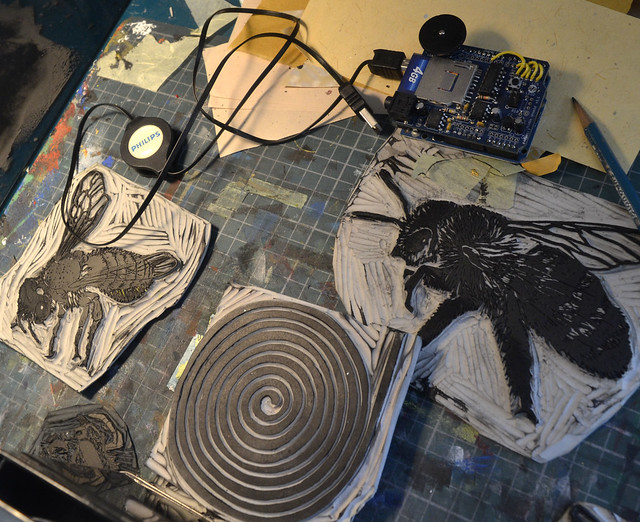
My bee lino blocks and spiral lino speaker block, along with the Arduino and Wave Shield. You can talk to the Arduino via serial port. I combined the open source code wavehc_play6.pde (which plays different 6 audio files when 6 different buttons are pushed) with ArduCapSenseBlinky.ino which employs a collection of capacitative sensors to trigger a collection of LEDs to flash.
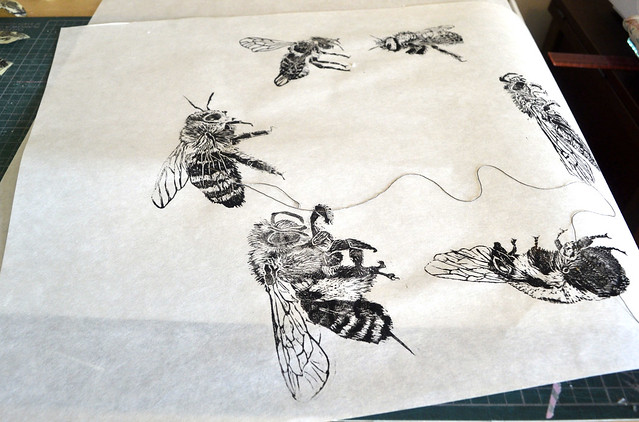
To make an electrical connection from my 6 bees (honeybee, bumblebee, leafcutter bee, long-horned bee, blue orchard mason bee and sweat bee), which I block printed in Bare Paint with block printing extender on Japanese kozo paper, I sewed through the paper with electrically conductive thread. I wanted the speaker, magnet and electronics to be behind the sheet, so I needed to pass through it.
I also printed each bee block on a variety of Japanese washi papers, to get the colour and texture of the bees and wings. This also hides the stitching/electrical connections. The story I'm telling with the piece is about how bees live here. We all know the honeybee, with its hexagonal cells in its hives, but it's not native to North America. Most of our native bees live in holes and burrows. They also come in a wide range of colours. So the other collaged, handmade papers, represent how the bees live, from the hexagons with the honey bee at the top in yellows, to the circles in blues and greens at the bottom. In this shot you can also see the spiral speaker printed on the reverse. The sheet is on kozo paper which is very strong, but not at all stiff. So I backed it with book board to have something on which to mount the electronics. My trusty multimeter is there so I can check that each bee does have good connectivity through to the digital I/O pin on the Arduino.
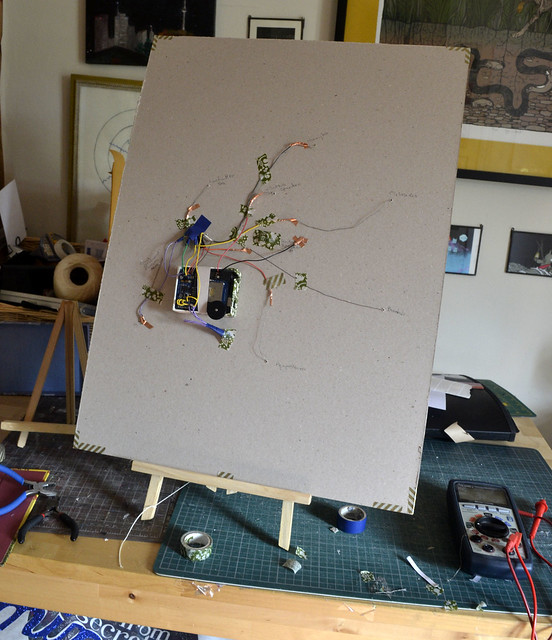
This is what's hiding behind the piece. I affixed a small box to hold the Arduino. There are six DIO pins at the top of the Wave Shield board connected to wires in purple, green, yellow, orange, red and brown. These in turn are connected using copper tape to each of the 6 conductive threads coming from the 6 bees. The threads from either end of the speak spiral are likewise connected to the speaker output and ground.
I made a short recording for each bee. I tried to find audio recordings of each different species. Back in 2012, Sarah Peebles directed me to some of her audio recordings on Reasonating Bodies. I also simply searched YouTube for videos of each type of bee. I combined these (using Audacity... which is pretty awesome freeware for simple sound applications) with my spoken words about the bees and save these as .WAV files which can be played by the Arduino Wave Shield. So I was able to say how though the honeybee might be our idea of the canonical bee, our "default" bee, it is in fact not native to North America, and many of out native bees are quite different; many are solitary, producing neither hives nor honey, and coming in all sorts of colours. You can see and hear my piece at the Graven Feather show the Bees (& the Birds), which runs June 4 through 27. I'll post a video of the piece in action later. You can find each of my bees prints separately here (and learn a little bit about each species too).
*In fact, this is how the gravimeter I used for my doctorate worked too. Picture a mass suspended on a spring such that the spring force upward is balanced by gravity downward. Should the force of gravity change as you move the sensor (due to a large buried mass below, for instance) the mass on a spring will no longer be in equilibrium. The sensor was the most extraordinary, delicate, tiny, spun quartz spring terminated with a tiny piece of quartz coated in gold between capacitative plates. When the mass moved, an electrical restoring force was applied to the plates which returned the sensor to equilibrium. This restoring force could tell you the change in gravity, or, in my case acceleration (since I kept the gravimeter still, it was the seafloor which moved up and down).
**A good source of strong magnets: old hard drives
RJH bought me a motion-detector frog* (yes, you read that right) the other day, at the dollar store (yes, believe it or not there are a large number of motion-detector frogs there) to cheer me up. See, this is a pretty demented, simple, electronic product, and its existence and unexpected availabilty amuses me. I mean, who knew there was a demand for motion-detector frogs? He didn't seem very sensitive and at first did not ribbit until poked (the frog that is, not RJH). He was happily sitting, silently in my studio, until he decided that my every tiny move was cause to ribbit. So, I decided to place him outside to scare squirrels from my herb garden. Sadly, he's now responding to every tiny breeze and I think I had better go move him before he drives the neighbours mad.
*Not exactly as illustrated. That's a actual, real-live frog I photographed in NB. The motion detector frog is sort of like that, except more plastic, and prone to sporadically playing a recorded ribbit.**
**'Ribbit' is a Canadian word for the sound made by a frog, used also as a verb. I recall hearing a CBC radio interview with the OED who had recently decided to include it in its new editions. Apparently, outside of Canada, frogs just croak, which is weird if you've ever listened to the wide array of frog song. Strangely it was also the name of our high school mascot.
The One of A Kind Show is such a large
operation that they have extensive paperwork and contracts for sellers.
They of course have lawyers and need to protect themselves against
liability. So, part of this paperwork includes informing sellers of
pertinent regulations. I've been reading through these documents this
morning and I've learned a few things. Officially, to be making pillows
or stuffed animals (less than 1000 items per year), in Ontario, I am
required to have a licence as a home hobby or craft operator, and to
label these items with "New Material Only", my license number, and the
content of the stuffing (in both official languages, of course). I have
almost never seen this from small hand-makers. Perhaps luckily for me, I
will only be selling art at OOAK.
The other concern I have from
reading all this documentation is whether my lightboxes qualify as
electrical devices and would require an inspection certificate. Also,
I'd like to know how much that would cost, and whether it would be worth
my while. I do know that the risk of fire or electrocution is nil...
but I've been reading Electrical Safety Authority website all morning
and frankly have no idea. Clearly, they did not design that site with
one-person manufacturers in mind. There are CSA regulations for LED
displays but it would only cost me $412 to
READ them! (Yes, that was a sarcastic use of italics.) It's enough to
make me think I should not sell anything powered at OOAK.
This year we decided to try and keep to a very select assortment and not make it a really late night. RJH spent yesterday completing the roof on the garage (yay!) and had to work today to cover a shift for a friend. I selected my top three choices and that's how we began our night.
We began at 'Constellations' at University College. I was interested in the 'Jansen Walker', because it was described as "elegant, multi-legged mechanical beings" - kinetic, interactive sculptures, inspired by the work of Theo Jansen. I envisioned something like the marvellous and quixotic Standbeest perambulating around the quad. So, I was a bit underwhelmed by an automaton made with PVC tubes and a hand crank which made interesting noises. Sure, I got to interact with the artwork, but I was expecting something with some life of its own. I was pleasantly surprised to find the lawn scattered with sleeping (and quietly snoring) sod people, the earthen golems of XXXX Collective.
I was even more pleasantly surprised by Robert Wilson's Gould Variations, a series of videos portraits in celebration of Glenn Gould. I saw the sign and thought, haven't we seen this before? How many films can we make in honour of Glenn Gould (who, incidentally, seems to be the secret theme of my weekend, what with CBC radio's show this morning)? I was tempted to skip it. Little did I suspect I would see Robert Wilson’s South American Horned Frog Video Portrait series. What says Glenn Gould like South American Horned frogs? In fact, it was engrossing. The work was designed for the site and it showed. It involved a large collection of variations on a theme, of course - technicolour videos of South American horned frogs, in various unnatural colours and at various angles with a soundtrack combining river field recordings and frog vocalizations mixed with Canadian pianist Glenn Gould performing his own arrangement of Bach’s Goldberg Variations (the recordings for which he is most famed). This unexpected combination and well-conceived hanging created an otherworldly, immersive environment. The subtle movement of the frogs and their vocalizations really triggered the viewer to watch and listen carefully. The long hall-like shape of the gallery, with smaller rooms branching off, each lined with huge flat-screens of fluorescent frogs, made the entire experience dreamlike.
We continued to the Crave Crawl Cave, created by Claro Cosco, Grey Muldoon, and Piffin Duvekot, a series of geodesic-dome style knit and other textile tents, each with its own sensory environment. I love the idea of inviting the viewer to crawl through sculptures. They were a bit on the small side, however, which meant that few people could enter at once, and most of the people who chose to do so were children (at least when we were there), who were the only ones with the sense to understand that they could play with the art.
I crawled into the largest of the three, which was an eerie, blacklit, fluorescent cave with doily cobwebs.
We left UC and headed downtown to the CBC building (past the Glenn Gould studio and well-known sculptural portrait of him on his bench), to see Andrew Kearney's SKYLUM, an interactive, light and sound inflatable blimp inside the atrium. SKYLUM responds to the audience, changing its soundtrack and light show depending on the proximity and movement of the audience. It was sort of magical, looming in the atrium, but the interaction with the audience was less than obvious; I wish it had been more pronounced. Though some people danced vigorously, trying to get it to change its tempo.
We drove by The Other Side, a four-way video feed, with screens on each corner of York and Adelaide, showing the opposite corner. It seemed to me like a dud, not the least because two of the screens were inoperable. We then attempted to see Light Seeds, at overhead walkway at Church and Gould, the installation by Science on Art a collective of Ryerson’s physics and engineering students. We despaired of driving or parking nearby and RJH suggested that I get out of the car and walk, while he tried to park. On my way, I passed Thought Balloon, which allowed viewers to project their "thoughts" (tweets) onto the surface of large glowing balloons. I overheard one woman ask the man she was with whether his tweet had been projected, and he told her she would never know. This was the point of the art - to play with the idea of public versus private.
I made it to "Light Seeds" and waited briefly in line for my turn at the controls. The students had suspended lights in the windows of the overpass. The lights responded to their environment: some were like the level lights on a stereo, responding to the music, the others were like a giant Etch-A-Sketch. There were two sets of controls at the front with three dials apiece. The dials controlled the vertical position of the light, the horizontal position and the colour. So, the two viewers at the front of the line were able to "draw" with light pixels (confused by the second controller, of course). At the front they also had two smaller displays: a Geiger-counter controlled three-colour LED strip, responding to beta and gamma radiation (which, in case you were unaware, is everywhere on the planet, to some degree, because of the ubiquitous nature of radioisotopes in the environment), and a little LED-encrusted sculpture which was controlled by a hand-written pencil sign which read "Touch Me". Graphite, of course, is electrically conductive, so it can act as a capacitative sensor (so that by touching the text, one is changing the capacitance being sensed by a simple circuit, which in turn changes the lights).
We continued through the Ryerson campus and happened upon something which I think was unofficial. It was certainly low-tech, but rather entertaining. In the drained fountain, next to some official exhibits like 'Aura', there were several people bicycling around with their bikes in fish and shark costumes.
At this point, I had seen my top three selections, but we continued on foot towards the Eaton Centre, passing "Dean" the neon man. I'm not sure if he was a mobile exhibit, or an unofficial one, but he was lit with actual neon lights, as well as EL wire (electroluminescent wire, or 'cold neon') and lightbulbs.
We passed REFLEXION, a large crystal of interactive video in Yonge-Dundas Square, but it seemed underwhelming, while the crowds were overwhelming. We passed many buskers between Dundas and Queen, along Yonge. Eventually I managed to get into the Eaton Centre, to see Max Streicher's Vertical Constructions: Dancer #1 and Dancer #2, while RJH shot more photos outside in the crowds. These were large amorphous inflatable sculptures made from recycled vinyl billboards, suspended from the ceiling. They were well suited to the space, both is size and in media (what with the hints of advertising).
RJH wanted to see what was going on at City Hall. We saw a video projected on the back of the curved towers of Nathan Phillips and in the middle of the square, we found World Without Sun by Christine Davis. Clearly I'm not the only one who thinks these are two great things which go great together. I don't know how a video installation combining space and jellyfish had escaped my attention, so I'm glad RJH suggested we check it out. I think it might have been the somewhat pompous description; with hundreds of events to choose from, I rule out anything which has a description which bores me. I think that curators and artists should take heed. I am an engaged participant who actively thinks about and creates art; if your descriptions are scaring me you are not going to capture the less engaged public. The installation itself was engaging! Six videos projected on large raised disks showing footage of things like jellyfish, interstellar nebulae and neurons, inviting the audience to connect the imagery. Two viewers where lying on the ground watching upside-down, mesmerized.
We continued south to attempt to see All Night Convenience. We passed the whimsical The Way Things Are, with its floppy street lamps, like melted Dalà watches. The luminous, transparent convenient store, filled with free lanterns made of typical consumables, was of course, too popular to enter (with a line up across the entire square), but I appreciate its existence.
We continued to St. James Park for one final stop. I wanted to see Lenticularis, another kinetic sculpture. It looked little like the artist's rendering. It was described thus: "The work billows and sways as a luminous assembly of lanterns, fans, and undulating surfaces. It is an interactive matrix composed of numerous translucent structures linked together to form a lightweight canopy. Individual parts of the canopy are constructed to rise and fall with changing air currents, affecting the sculpture's overall shape." A bunch of white sheer curtains, a fan, some lights, and a web of plastic, would be more like it. Though, it was pretty, if small, and less than advertised. Perhaps it had to be scaled down due to a last-minute change in location.
Overall we did quite well. I saw more than expected, and never had to wait in line more than about 5 minutes. Some of the best exhibits were those we happened upon. Crowds were thick, particularly on Yonge, which is always a magnet for out-of-towners, but the mood was good, and we encountered fewer inebriated or uncivil people than last year. I particularly appreciate seeing not only the listed independent projects, but evidence that people are making this their own - in small ways, like dressing with glow sticks or lit fibre optics in one's hair, or the large number of people parading with the All Night Convenience lanterns, to the larger, full-blown costumes like Wonder Woman, DeadMau5, and the Dean the neon man. Nothing encourages me more than seeing thousands of people spending their night seeking art and inspiration. That's why you can't keep me from Nuit Blanche.
This is another project in progress. I love the idea of paper computing or paper electronics. I'm planning a print (Ã la Italian-speaking polar bear) which interacts with the viewer by making sound when approached. So I want the print itself to act as a (capacitative) sensor and a speaker. I've been sourcing electrically conductive paints and inks and even tried to make my own with graphite and block printing medium. I settled on Bare Paint which seemed the most user-friendly (though it is only available in black, I suspect because it's full of graphite). It's slightly tempermental as a block printing medium, but only slightly - which is great news as they never claimed it could do this. They have examples using it as a screenprinting medium, but usually screenprinting ink is less viscous. This 'paint' is quite thick and viscous so I'm really pleasantly surprised at how it performs in a block print. (They also produce an electrically conductive body paint so you can be a circuit and have blinkie LEDs shining on your skin, or your body can be a MIDI interface, if you so desire.) They even have a tutorial for how to make a capacitative sensor, which I followed. I combined their Arduino code (basically the CapSense library with slight tweaks) with some advice from Lady Ada's tutorial on using switches with Arduinos and Leah Buechley's Simple Arduino Audio Samples tutorial and the tutorial for paper speakers from the Kit-of-No-Parts by Hannah Perner-Wilson. There's no point in re-inventing the wheel, people. You'll have to turn your volume up to hear the buzzing, but it's there*. I believe the weird noise at the beginning, is because the start of the sample is being triggered repeatedly; I should be able to write better code to avoid that and go straight to the buzzing bumblebee.
As you can see, it worked in my demo, but it isn't yet very robust. Sometimes if I restart the Arduino it gets caught in a loop, constantly re-triggering the start of the sound sample. I plan to work on the code, and maybe play with the resistance accross the two pins to sense and receive the varying capacitance, and maybe add a small capacitor for stability. The other issue at the moment is power. I seem to be going through 9V batteries at an untenable rate**, so I hope to be able to switch to rechargeable AA batteries (and lowering the voltage, because no one want to deal with 6 batteries). Alternatively, I might get a 9V adaptor to power both the Arduino and the FET which switches the speaker on. That might be the way to go for the final product. Eventually, I'd like this to work with some very small parts; just the chip from the Arduino***, the FET, some resistors, maybe a capacitor, minimal wires or conductive thread or copper tape, a magnet, and power. I also need to find out if there is any difficulty having the sensor printed on one side of the sheet and the speaker on the other; after all, two conductors with paper sandwiched in between is by definition a capacitor so I wonder if I need any shielding or anything.
Also, I trained it to play the Ode to Joy (badly, from a musical perspective) employing the Tone function which outputs square waves at the frequency of notes. Now, don't you want to see what you could make your art do?
Note: If you're just here for pretty pictures and such and cannot make heads or tails of my descriptions of software or hardware, feel free to ask. I hope the above is comprehensible. If it isn't, feel free to let me know.
*thanks again Synap for the sound sample
**why don't they mark Amp-hours on these things?
***I think I'll have to use an ATMega chip, because the ATTiny only has 2K of memory and I don't think I can write a program and store 3 seconds of sound data in that little space.
It's true - though very briefly. I took one of my polar bear proofs and used copper tape to make a spiral on the back, following this tutorial for paper speakers from the Kit-of-No-Parts by Hannah Perner-Wilson. I hooked up the controlling circuit for high current loads with a digital pin on my new Arduino Uno microcontroller (ciruit design by Tom Igoe, shown below, though I ignored the potentiometer, so my simple speaker has no volume control... though I could add one - the speaker is connected where the motor would otherwise go). So the parts needed are: Arduino with power (I used USB connection to my laptop), some jumper wires, a transitor, an extra 9V battery, the print with its copper tape spiral and a magnet (I used the magnet from within an old junked harddrive, because this is both free and a very strong magnet). Then after trying some simple tones, and basic modifications to C programs which come as examples with the Arduino, I tried running Leah Buechley's Simple Arduino Audio Samples tutorial. It's a software solution which lets you play a 4 second sample, so long as it is only 8 kHz and mono - without adding anything else to your microcontroller. It comes with a sample of someone saying 'Arduino Uno' with a proper Italian accent. It is rather cool to hear the print itself vibrating to make the sound of an Italian woman speaking. Now, I know that some of the above may read as goobledegook to anyone unfamiliar with basic electronics or programming, however the point you should take away from this is that it is now very posible for anyone to buy some simple open source parts (for about $25 - $30), follow some on-line tutorials and make their 2D artwork itself produce sound! It is in fact posible to do this even if you do not understand the circuit or the software (though, I would encourage anyone to try to follow that too, as with most things, it's easier than you think).
The next step to make some prints which interact with the viewer (listener?) audibly! Thanks to Synap for helping me get some appropriate sound samples! There will be more of this to come (I cannot bring myself to say 'stay tuned' as it is just too corny a pun).